A solar eclipse doesn't happen very often - therefore it's not a common photography theme. Find out how you can prepare for shooting the eclipse and stay sure you won't miss any single detail.
You don't have to be a pro or have tons of costly equipment to capture some amazing shots of the upcoming eclipse. This guide is intended for amateurs who'd like to take advantage of a rare opportunity. With it, we hope to help you increase the odds of grabbing some memorable and perhaps valuable photos.
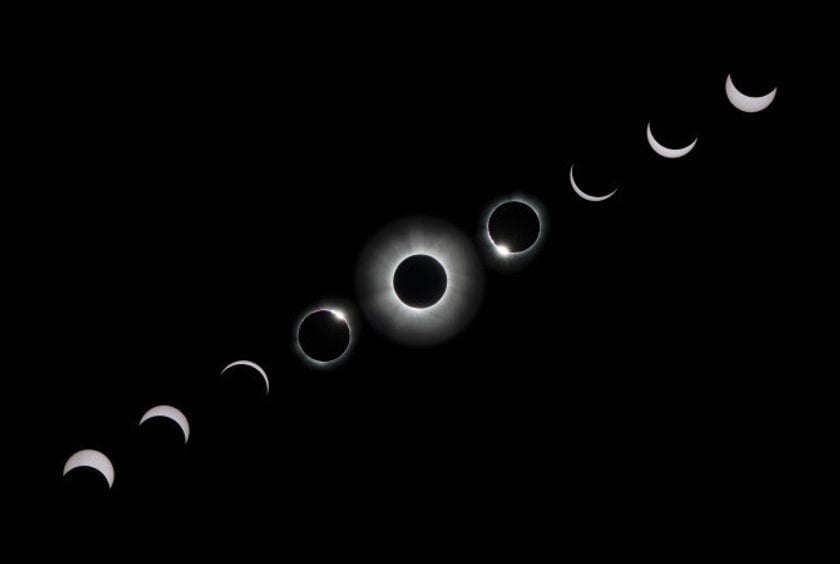
 ©Rick Fienberg / TravelQuest International / Wilderness Travel
We're not going to delve into the mechanics of a solar eclipse, and when or where to photograph it. There are more than enough resources out there to answer those questions. If you're interested in that information, we'd recommend reading this article.
How to Take Photos of a Solar Eclipse: What is a Solar Eclipse?
If this phenomenon is observed from Earth, an eclipse occurs when the Moon is about the same as the angular size of the Sun and can be in partial phases. The Moon and the Sun have different diameters, and the Sun is many times the size of the Moon during the eclipse. But because the Moon is closer to Earth, the angular size of its disk appears to be the same as that of the cover of the Sun. This is why, when the Moon is on the line between the Earth and the Sun, it obscures the Sun, which becomes invisible from the Earth and in that way total solar eclipse occurs. This creates a shadow on the Earth's surface in the form of a spot, which, as the Moon rotates, scrapes across the Earth's surface and passes as a narrow shadowy strip. Sometimes the trajectory of the shadow passes through inaccessible or remote areas of the Earth's surface for humans. To see the eclipse, whether you're photographing a total or annular, you need solar viewing glasses.
When to Photograph a Solar Eclipse?
As we have already determined, the sun emits a lot of light, and to work comfortably, we need to control the flow of light, which is helped by the aperture and shutter (in everyday photography). But for taking a picture of the solar eclipse we need an additional tool: a neutral gray filter (ND filter). There will be a separate article about what types of filters there are and their application, and we will talk in detail about the neutral gray filters there as well.
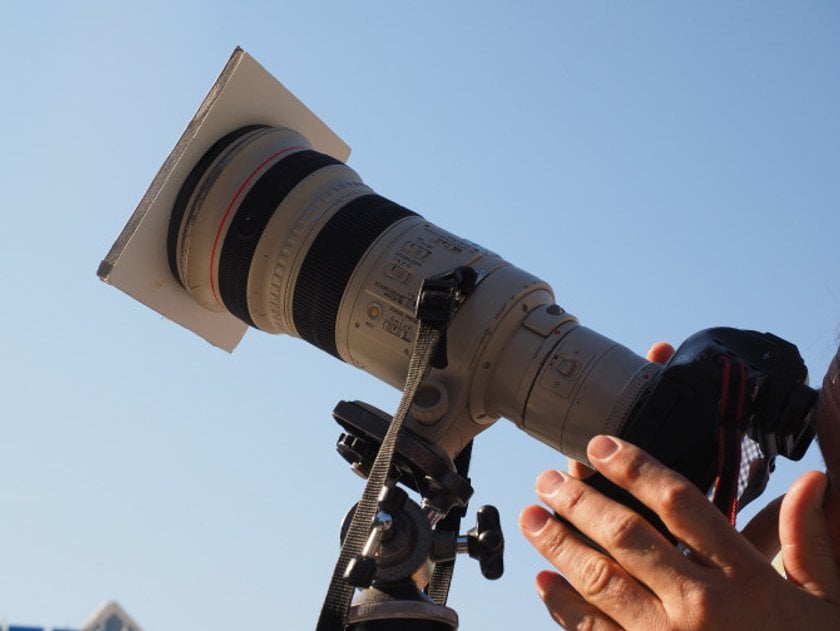
Such a filter is a dark glass screwed on the lens or a rectangular plate fixed with special holders. ND filters come in different densities (varying degrees of darkening). For our purposes, it is better to take rather dark filters, marked ND16 to ND1000. Such a filter will save both the camera sensor while taking solar eclipse pictures and your eyes when shooting through the viewfinder. It is better to use a quality filter made of optical glass rather than plastic. It will also provide good protection from harmful ultraviolet rays.
Also, you should not point the lens at the sun for a long time - focus, make a shot, take the lens away or close it with a cover. To get a close-up picture of the sun in the frame we need a long focal length lens of 100 mm or more. For the convenience of solar eclipse photography, you can use a tripod, because depending on the type of ND filter chosen the shutter speed can be shorter than the optimal value for a particular focal length.
When Is the Partial Solar Eclipse?
A solar eclipse is a rare phenomenon. You can find the date of the next total solar eclipse on the solar calendar. According to scientists' calculations, there will be about 224 total solar eclipses between 2000 and 2100! You can view the eclipse or photograph this rare event like the full solar eclipse about once every few years.
Can a Solar Eclipse Damage Your Camera?
How not to damage the camera? Here is a list of tips for solar eclipse photography. Remember how easy it is to set something on fire by focusing sunlight through a magnifying glass. But a camera lens (especially a telephoto lens) will work in exactly the same way. It will focus light on the camera's sensor just as a magnifying glass does on a piece of paper. You won't make a hole in the matrix, of course, but you could easily put it out of action! It's especially dangerous for compacts and operate cameras where the lens is constantly projecting an image on the sensor. SLRs are in a different situation because the light hits the image sensor only when you take a picture and the rest of the time it hits the viewfinder through the mirror system in the eyes of the photographer. This is also far from safe: without special filters, it is strictly forbidden to look at the sun through the lens, and you risk eye injuries.
So, the general tips to set your camera settings while photographing a solar eclipse are as follows:
- Do not use slow shutter speeds (longer than 1/30 s). First of all, it's useless, and you're likely to get a badly overexposed shot. Secondly, the slower the shutter speed the longer the time the camera matrix will be warm in intensive sunlight;
- Telephoto lenses (focal lengths longer than 70mm equivalent) are the real danger when taking pictures of the eclipse. The longer the focal length is the longer the sun gets in the frame and the more intensive the light flux from the sun passes through the lens while the partial eclipse;
- So there is more risk of damaging your eyes and equipment. On the other hand, you can shoot with wide-angle lenses without worrying - with wide-angle lenses the risk of damaging your camera is almost zero. The longer the lens you use (the longer the zoom) the more carefully you should listen to this advice. Ultra wide-angle lenses are not dangerous.
You can make photos without such settings and techniques when the sun is very close to the horizon line or in a dense haze. Then the light from it is not so intense, like during the annual solar eclipse, and by the way, very beautiful. It is not for nothing that photographers love the sunrise and sunset shots so much! Now we can talk about learning how to photograph solar eclipses.
Required Equipment For Photographing Solar Eclipse
Solar eclipse image photography doesn't require all the gear you might expect. There are a few important pieces of equipment to protect your camera's sensor and your eyesight, but. Let's take a look at the list of equipment you're going to need.
- A sturdy tripod with a multi-axis head
- A cable or remote shutter release
- A DSLR or mirrorless camera
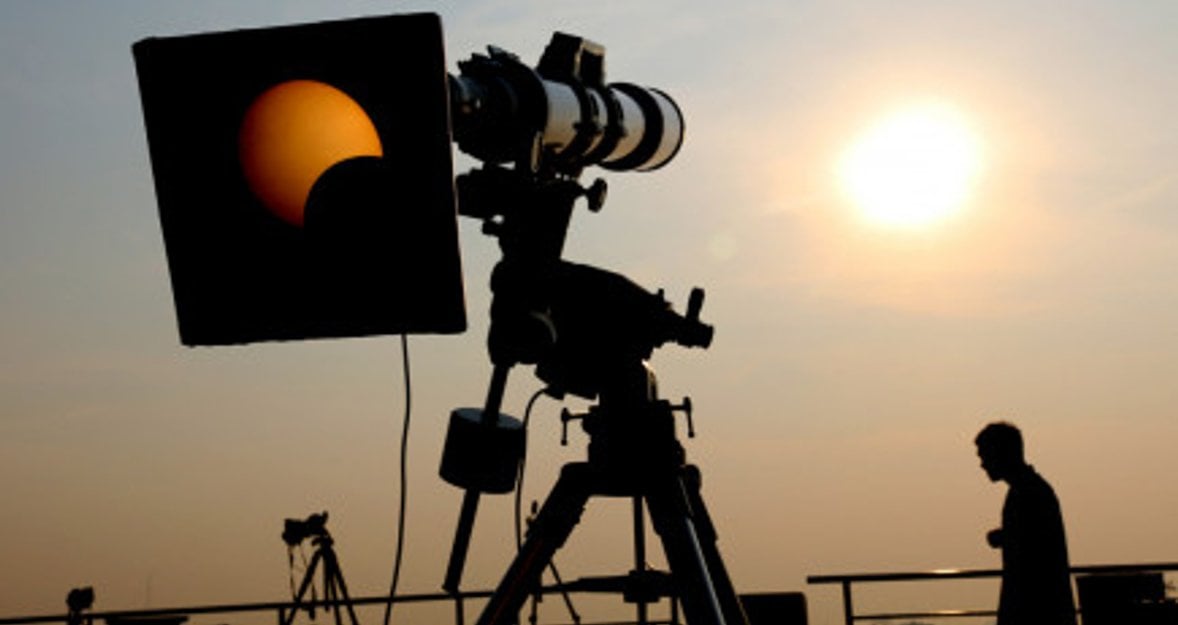
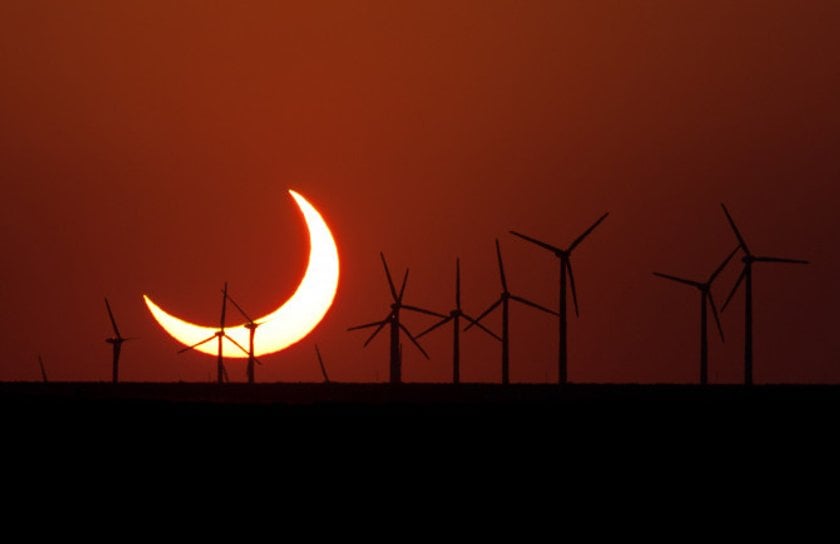
- A telephoto lens (maybe): Your 70 -200mm or 75-300mm kit zoom lens will do the job just fine. If you don't have a long lens, don't count yourself out! You can still create incredible images with a wide angle lens by photographing a total solar eclipse over the landscape. (See the example below.)
- PROPER Filters: There are several types of solar filters available, from DIY black polymer and inexpensive folding paper ones to pro-level filters at $150 or more each. Don't try your standard ND filters; they don't block enough light. You can start by looking on Amazon.
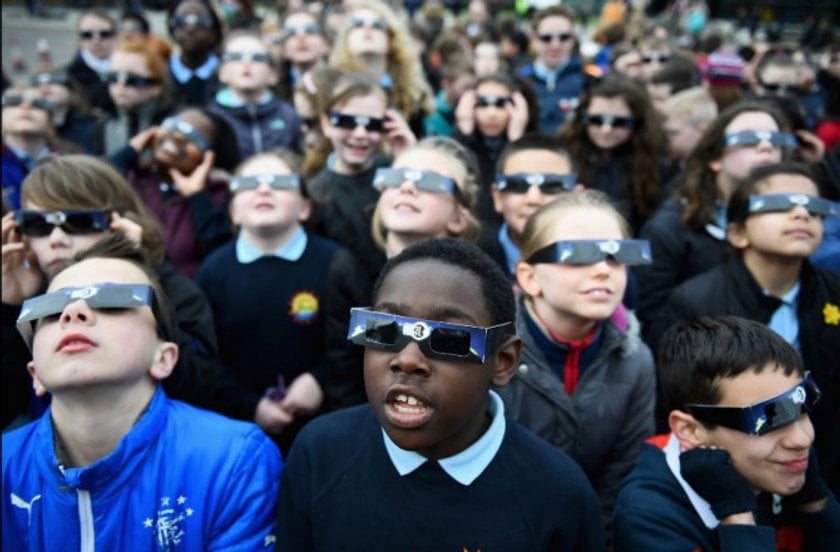
- Eye Protection: While you're looking for filters pick up some goggles or glasses, too.
- Fresh Camera Batteries
- Fast, formatted memory cards
 ©2012, Evan Zucker
Commons sense should dictate the rest of your list. Know where you're going to be and be prepared for anything.
Taking the Photos of Partial and Total Solar Eclipses
Get to your shooting location early. Attach your solar filter to fit and get the sun in your frame. Set your lens to Manual focusing. Use live view and zoom in. Once you're sure the sun is sharp, lock the focusing ring with a piece of tape or other means. If your DSLR camera has a mirror lock-up option, enabling it can help eliminate camera shake, too.
Exposure settings: Here's where things get interesting. Grit your teeth and switch to M. Don't worry; you'll find a good table of exposure recommendations in the “Solar Eclipse Exposure Guide” section of this article, as well as information on bracketing your exposures .
Shoot RAW: Last, but not least, set your camera to record the images as RAW files. Yes, this will use card space faster, but you'll have much more latitude in processing your RAW images.
And... GO!
Once you've completed all the steps above, just keep the sun framed by following it in live view. When the shadow starts to appear, start shooting. Be ready to swap batteries or memory cards quickly if necessary to make an eclipse shot.
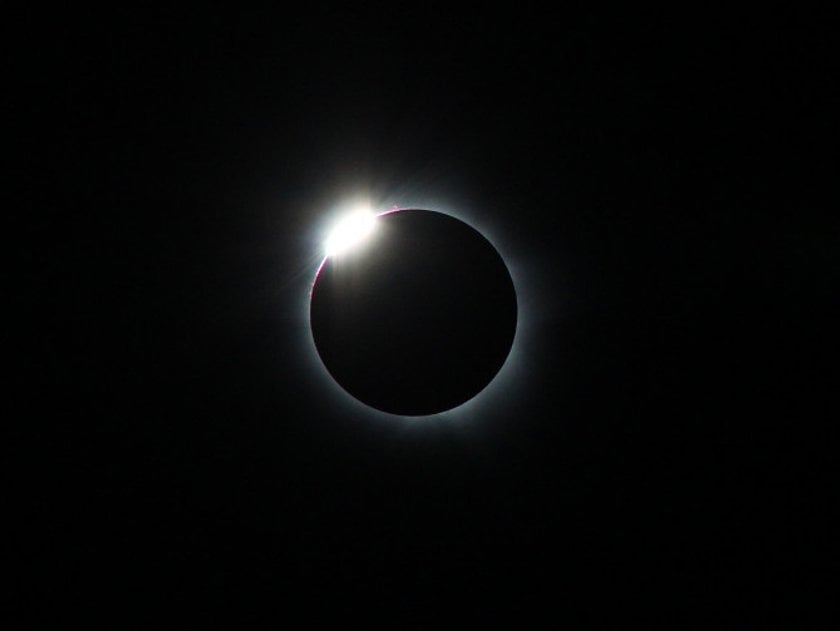
About Totality
If you happen to be in a location where you can shoot the total eclipse, you should know that when it reaches totality, the rules will change for a couple of minutes. First of all, when the sun is completely hidden, you'll want to remove your solar filter. You can also view the spectacle with your naked eye for about two minutes.
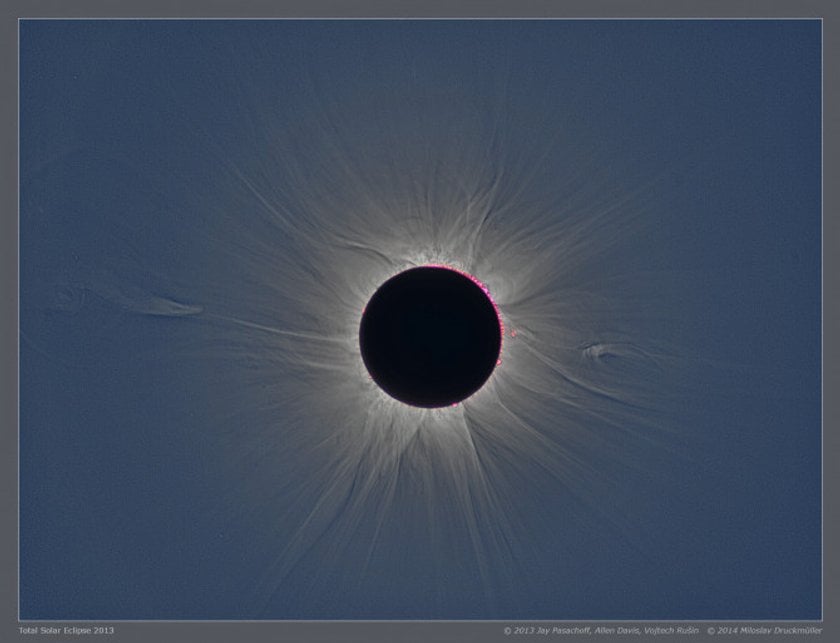 ©2013, Jay Pasachoff / Allen Davis / Vojtech Rusin / Miloslav Druckmüller
This is when “day turns to night”. With the direct sunlight blocked, you'll be able to see or photograph the Sun corona streaming out around the darkened disc. The light emitted at this point will be much fainter, which is one of the reasons you should be bracketing widely and shooting in RAW. Many photographers with the budget for it will set up a second camera for this phase.
Be ready to replace the filter and stop looking at the sun before that first bit of direct sunlight peeks through.
Processing Your Images
Once you're back at home with your photos, you'll need to work with them a bit. Luminar Neo will allow you to reduce noise and adjust contrast, brightness, tone, and color as needed:
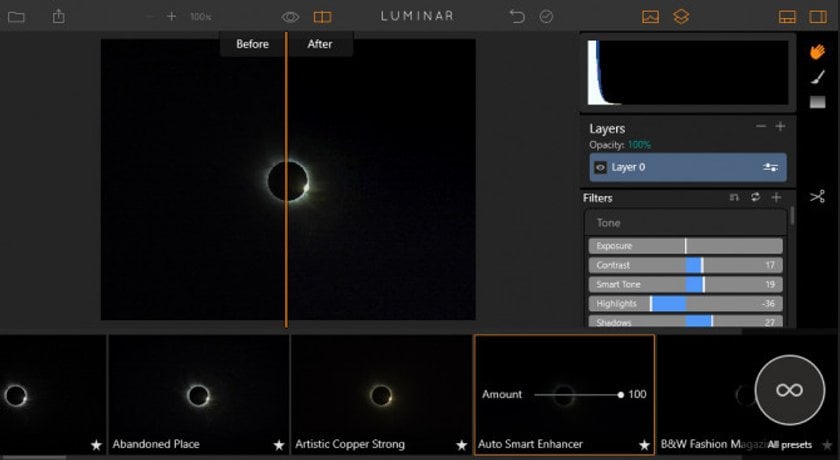
It's a fairly easy process to use layers to create a composite image, showing a sequence of shots of the eclipse phases. You may even want to try stacking some of your bracketed shots to increase the dynamic range, especially those taken during totality.
 ©Rick Fienberg / TravelQuest International / Wilderness Travel
Show Solar Eclipse Pictures Off and Market Them
As an amateur, you may be comfortable with sharing your work with friends on social media sites, but skeptical about their value. Don't underestimate yourself or the quality of your photos.
Sign up for a contributor account with gettyimages.com, shutterstock.com or one of the other popular stock photo sites. Not only will you have the chance to sell them, their screening process will help you refine them when they're submitted.
Sites like 500px.com will give you a platform that typically brings you more for the sale of an image than the average stock photo site. For an even more versatile platform, check out pixels.com, where you can offer your photos not only in several printed and/or framed styles, but also printed on a wide range of products like coffee mugs, cell phone covers and throw pillows.
Closing Thoughts
 ©Mark Margolis / Rainbow Symphony
The final point we'd like to make about this event is to take the time to enjoy it. Don't get so wrapped up in photographing it that you forget to look around you and just enjoy the phenomenon, as well as the reactions of other watchers. This will truly be a once-in-a-lifetime experience, so drink it in!