
Once you step into the marvelous realm of photo editing, you need to familiarize yourself with certain basic effects presented in most photo editing software and find out the purpose of these effects for your art and how to apply them practically.
This article specifically delves into one commonly used photo effect — vignetting. We will answer the most frequently asked questions about Vignettes: What does Vignette mean? What does Vignette do? What is the purpose of vignetting?
The article also includes practical instructions on how to apply the Vignette Effect on your pictures using the cutting-edge AI-based image editor Luminar Neo, in case you decide that Vignette works for your photography genres and styles and you would like to use it as one of the tools for your creative self-expression!
Vignetting: Meaning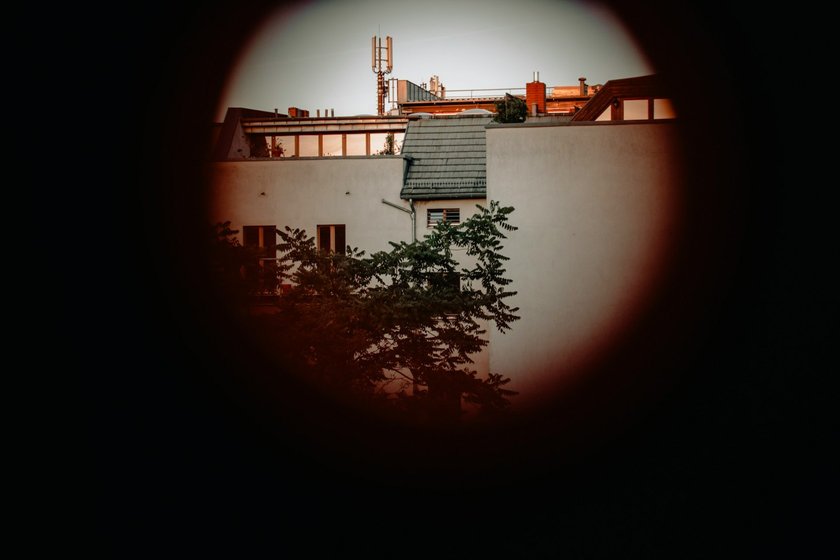

Definition Vignetting, or “light fall-off,” refers to having the image periphery much darker than the main object in the center.
Vignette in photography emerged as a bug. Many old photo camera models did not have an option to reduce the blurring of the edges of the pictures. Even in modern cameras, there is a possibility of mistaking the adjustments (like having an aperture that is too wide or a focal length that is too wide for this particular photo). Vignetting caused by the lens is called optical vignetting.
Accessory vignetting is caused by choosing the wrong equipment (like a lens hood is not of a proper size. Filters, filter holders, and other equipment parts can also play their role in vignetting pictures), which can lead to a round effect on rectangular images because the corners of it are shadowed.
In digital cameras, some sensors are flat. It means that pixels in the center receive direct light, while pixels at the edges receive angled light, making the edges darker. This situation is called pixel vignetting.
What Is the Purpose of Vignetting for Your Photographic Creativity?

As often happens in art, someone’s mistake turns into someone else’s creative opportunity. Photographers started to deliberately darken the corners of their photos to benefit their art, inventing a new kind of this effect — artificial vignetting.
The main purpose of artificial vignetting is to focus the audience’s attention on the primary subject of your picture, literally bringing it to the spotlight, shadowing and blurring the unnecessary and distracting lines and points of focus on the edges. It is especially useful for photographers who work with close-ups (for example, portrait or macro photographers).
Exclusive Tools of Endless Possibilities in One AI Editor
EXPLORE NOW!But a Vignette does not necessarily mean fading the picture periphery into black. The corners can be slightly darker than the center to gently lead the viewers’ eyes to what they need to see first.
Regarding creative expressions, Vignettes are frequently linked to a vintage aesthetic due to their prevalence in photographs captured using older film cameras, as mentioned earlier. Alongside sepia tones, Vignettes are among the most commonly found built-in filters in nearly every smartphone photo editing app, enabling users to craft images imbued with nostalgia.
How to Apply Vignette on Luminar Neo?
Step 1
Launch Luminar Neo and download your image within the software.
Step 2
Enter the Edit mode and choose the Vignette tool among the Essential Tools.
Step 3
Click the “Choose subject” button and point anywhere on the image to set the center of the Vignette. Luminar Neo allows the user to decide where the enlightened object will be located on the image and what will be blurred. The “center-periphery” paradigm is relative, and this software makes it possible to control it manually.
Step 4
Adjust the darkening around the edges of the photo using the Amount slider.
Step 5
Set the size of the obscured area with the Size slider.
Step 6
Apply Roundness to change the shape of the Vignette area if needed.
Step 7
Use the Feather slider to smooth the transition between shaded and lighted areas.
Step 8
Increase the brightness of the central part of your image with the Inner Light slider if needed.
Step 9
Preview and apply. Taking a few steps away from your computer at this stage is better because the Vignette is more clearly visible from a distance. Remember that Luminar Neo is a non-destructive photo editor, so you can apply effects and then cancel them as many times as you want without affecting the original image.
Step 10
Once completely satisfied with an edited image, save it on your device in your preferred format and share it with your audience.
Advanced yet easy-to-use photo editor
Get Luminar Neo Now
Bottom Line
Vignetting in photography, initially an unintended consequence or a technical flaw, has evolved into a deliberate artistic tool for photographers. Defined by the darkening of an image's periphery compared to its center, Vignettes serve multiple creative purposes. They direct attention toward the main subject, obscure distractions along the edges, and infuse images with a vintage or nostalgic aesthetic.
The intentional use of Vignettes, or artificial vignetting, empowers photographers to guide viewers' focus and elevate the significance of the primary subject. This technique is particularly beneficial for close-up photography, such as portraits or macro shots, allowing for emphasis on the main issue by gently darkening or blurring the surrounding elements.
For those utilizing Luminar Neo, a cutting-edge AI-based photo editor, applying Vignette effects is streamlined. Using the Vignette tool in Luminar Neo's Edit mode allows precise control over the Vignette's placement, size, roundness, feathering, and brightness. The software's user-friendly interface empowers photographers to manipulate and preview the effect before finalizing changes, ensuring the desired artistic outcome.
