
The synergy between specialized tools in digital image editing can redefine creative possibilities. Luminar Neo emerges as an indispensable ally within the Photoshop workflow, seamlessly integrating as a plugin to elevate the editing experience. As a bridge between artistic vision and technical finesse, this plugin invites photographers and digital artists into a realm where precision meets intuitive enhancement.
The synergy between specialized tools in digital image editing can redefine creative possibilities. Luminar Neo emerges as an indispensable ally within the Photoshop workflow, seamlessly integrating as a plugin to elevate the editing experience. As a bridge between artistic vision and technical finesse, this plugin invites photographers and digital artists into a realm where precision meets intuitive enhancement.
We will show you how to use artificial intelligence to make your images using cutting-edge software from Skylum. It works as a standalone program and a plugin within Photoshop, so we do not have to leave Photoshop to access Luminar Neo’s AI-based creative capabilities (relighting, retouching, sky replacement, etc.). You can add rays of light or brighten the features of the subject on a portrait — creativity knows no limits.
By effortlessly connecting with the filter gallery in Photoshop, Luminar Neo empowers users with many sophisticated editing features. From smart filters to AI-driven enhancements, its interface beckons toward a horizon where artistic expression meets computational precision. Let's delve deeper into how this tool redefines image editing paradigms within Photoshop's familiar landscape.
Luminar Neo — Your Companion Within The Photoshop Workflow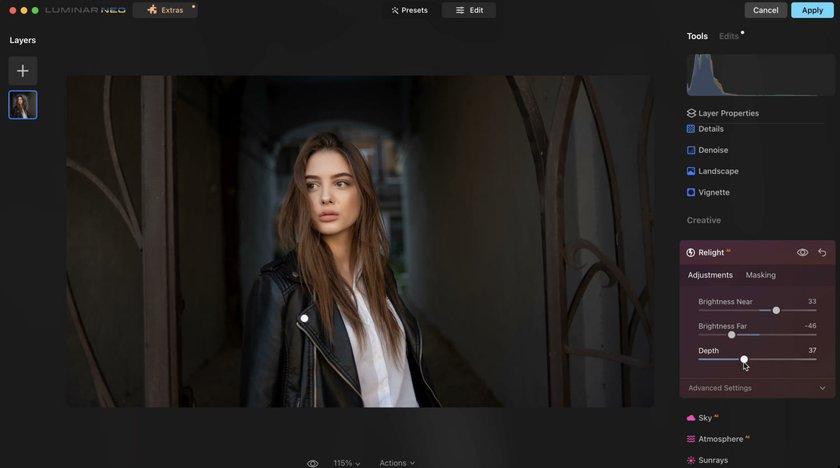

Luminar Neo, as a plugin, works under your filter gallery. We can access smart filters, so you should click on your background layer to convert to a smart object before doing anything. Once it is done, you can come back and edit this repeatedly.
Let's go to Filter and then to Software, where we select Luminar Neo. The chosen image will be loaded. It is starting our plugin and bringing up an entirely new interface and a few options.
We can go to the Preset tab to look through different presets by default and apply them to our images if we want to. But if you prefer to control the editing process manually, go to the Edit section and look through the variety of tools it offers.
If you are unsatisfied with how it turns out, you can always adjust the image as a whole or certain parts of it, leaving the rest untouched. Here, you can change the image orientation from vertical to horizontal or vice versa. Flip it or add a reflection on the water's surface. Adjust colors to make your image warmer or cooler. Bring some details into focus or deliberately defocus some objects for a dramatic effect. Relight your idea if the lighting conditions disappoint you during shooting. Apply different masking tools to enhance your appearance or certain parts of it. If you want a vintage-style photo, feel free to add grain to your image. The haze will make your photo more atmospheric, affecting your audience's emotions.
If you use certain tools often, it is added to the Favorites list for faster and easier access. You can manually add a device to Favorites as you right-click on it and choose the option from the menu.
Within the Develop Presets, you adjust your exposure to your black-and-white curves. Experiment with the image contrast and vibrance, add more shadows to the photo and sharpen it if you do not like the structure, just like in the Adobe Photoshop Camera Raw. Add fog for a special atmosphere or place the Sun on the image so that it will be more enlightened. The length and amount of sun rays, as well as the Sun's size and warmth, are under your control. Define and change these parameters the way you like.
Make your image more dramatic and experiment with color tones. It is much easier than going through the complicated tools of Photoshop to see whether we like these adjustments or not and whether we need them at all.
If you go to Edits on the top right, go through the history of your edits to change and cancel whatever you want anytime. There is a Discard button at the bottom, so you can withdraw all edits and return to the original image.
Since it is a plugin for Photoshop, it is enough to click Apply, and after a few seconds of processing, the new smart object within the Photoshop workflow is created. Now we have Luminar Neo as a smart filter, so go to Smart Filters, click on this eyeball, turn that off and back on, and see all of that was done with Luminar Neo within just a few clicks of the button.
If you want to change something later, go right where it says Luminar Neo and double-click to open the plugin. The Edits tab with the full history of edits you can change or discard is available. Providing changes is fast and easy because the AI has already calculated how to cut your subject, and there is no need to re-calculate it repeatedly as you work on the same picture.
It is a smart filter so that you can continue with your Photoshop editing on top of this. You are still in Photoshop; you do not have to exit to use a special program. You are back with all of your layers intact. Use all the same Photoshop tools that you know and love. You can turn the smart Filter with the Luminar Neo effects on and off anytime, changing the settings however you like and having a good base for working on your images. So don't wait. Download Luminar Neo and integrate its powerful features into your workflow today.
Use AI-Powered Features From Luminar In Photoshop

The most pleasant bonus of using Luminar in synergy with Photoshop is access to high-quality AI products. Luminar has AI assistants for any task. You can realize almost any idea in your photo.
Enhance AI analyzes your image and finds where it can adjust your highlights and shadows using artificial intelligence. Sky AI is cutting out our subject using AI and finding the sky in the original photo to replace it with one of the numerous options available in the built-in gallery: whether you want to have a blue sky on a sunny spring day or a gray, foggy sky of November, whether you want the Sun to rise in your picture or you want your audience to admire the starry night — the Sky AI is at your service.
Relight AI is much more than changing the brightness — it calculates what is supposed to be close to the camera and light sources or far from them, and you can change these parameters regardless of the initial conditions. You can also change the background and foreground if necessary.
Portrait Bokeh will automatically cut your subject out and add a bit of bokeh to the background within seconds. Face AI detects and enlightens the face of your subject. Skin AI finds skin imperfections and gets rid of them. You can experiment with the skin tone as well.
That's not all the AI features you can find in Luminar Neo. Try experimenting and using different tools to create impressive photos. Be it portraits, landscape, macro photography, in the studio, in the city, or nature — you have all the tools to transform an ordinary picture into a deep story. We also recommend reading the Luminar Neo review to better understand the software's capabilities.
Advanced yet easy-to-use photo editor
Get Luminar Neo NowBottom Line

In the ever-evolving sphere of digital image editing, Luminar Neo stands as a beacon of innovation within the Photoshop ecosystem. Its seamless integration as a smart filter empowers creators with editing possibilities, from AI-driven enhancements to nuanced adjustments. By seamlessly merging with the familiar interface of Photoshop, it not only complements but elevates the editing journey.
The dynamic capabilities of Luminar Neo, from AI-powered subject isolation to intuitive adjustments, redefine the boundaries of creative expression within the confines of a familiar environment. Its ability to preserve layers, allowing for continued Photoshop editing atop its enhancements, signifies a harmonious coexistence of specialized tools. With Luminar Neo, the Photoshop workflow transcends conventional limits, inviting users to explore a realm where innovation and familiarity converge, offering boundless opportunities for artistic transformation.